Using an ALIX 1D computer as an UMTS gateway
Switzernet - Christian L.
2008-10-01
After transfer from the normal PC to the Alix, networking does not work
Linux does not boot if no monitor is plugged on the Alix
This document shows how to install Debian Linux on an ALIX.1D motherboard (http://www.pcengines.ch/), and use it as an UMTS gateway with an UMTS USB adapter. It is not made to be a detailed how-to, but rather a quick overview of a working setup. At the end of this guide, the ALIX computer will act as a NAT gateway, offering DHCP and DNS on its Ethernet interface. This will lead to a small-sited Internet gateway, able to connect from nearly everywhere:
In our case, it will be used as an access point for demo SIP telephones.
Debian installation
This section describes the installation of Debian Linux. We choose to install the system on a normal computer with a compactflash <-> IDE adapter, and then transfer the compactflash card in the Alix computer. There is no difference between doing so and installing on a normal hard disk drive. The installer will guide you through the process. Settings that are kept to default values or logical (country selection, keymap choice, etc.) are not described in this howto.
Hardware setup
Use the compactflash <-> IDE adapter to plug the compactflash card in a normal computer. Plug it in the "primary IDE slot". Do not forget to also plug the power connector (same as for a floppy). Insert the Debian installation CD and start the installation process.
Partitionning
For partitioning, choose Manual. Delete existing partitions, and then create a new partition using all the available space. Use default settings (Ext3 file system, mount point /, etc.).
The installer will complain of the lack of swap partition (disk space that can be used as RAM). We do not want swap on a compactflash because it could quickly damage the card (on a compactflash card, the number of write cycles to a sector is limited. Confirm we do not want swap.
Packages
At the Software selection screen of the installer, you can choose which package sets you want to install. As we want a minimal set of packages, select only Standard system. When the installation is finished, reboot on the new system.
Setup after installation
Kernel version
By installing this way, Debian installs an i686 compiled kernel. It will not boot on the Alix board, as the AMD Geode processor is i586 (to check). Still on the normal computer, install a i486 version of the kernel and kernel sources, and uninstall the i686 version (it is safe to ignore the warning as we install another kernel after removing the original):
apt-get remove linux-image-2.6.26-1-686
apt-get install linux-image-2.6.26-1-486
Misc programs
apt-get update
apt-get install openssh-server
apt-get install bzip2
apt-get install linux-headers-`uname -r`
apt-get install build-essential
apt-get install ppp
Boot on the Alix computer
Remove the compactflash card from the computer, and plug it into the Alix box. It should boot without problems.
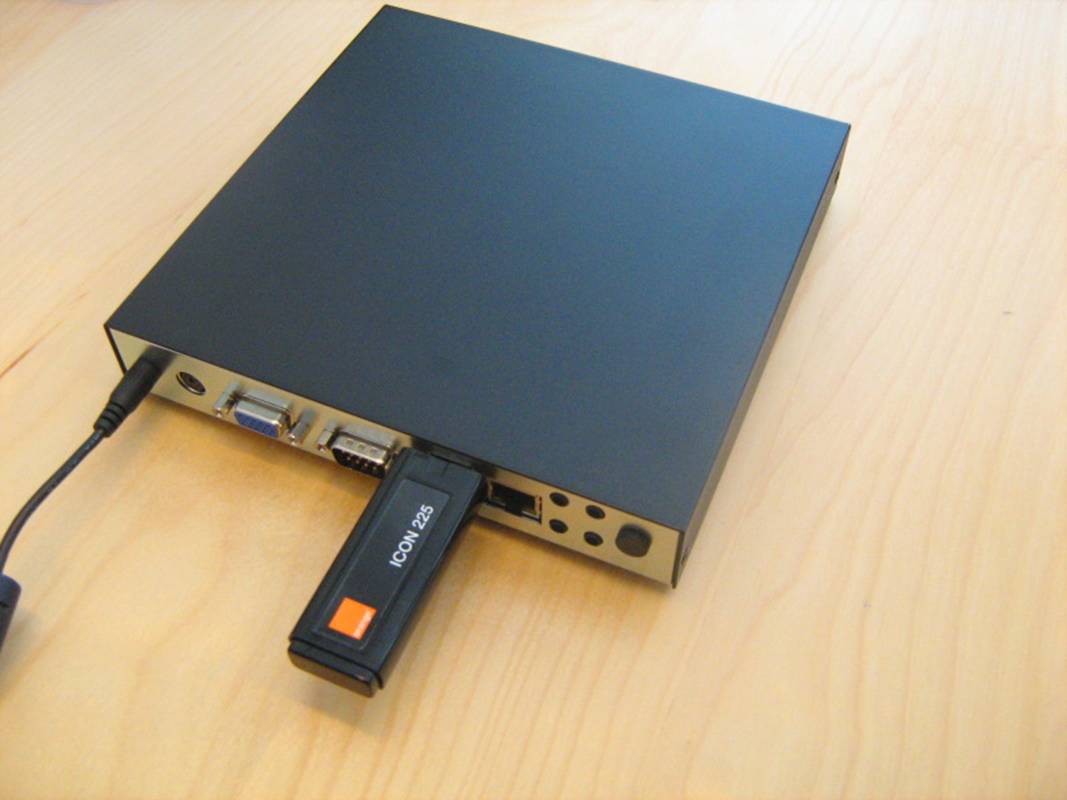
Installation of the USB stick
This section describes the installation of the UMTS adapter. In this setup, we used an Orange iCON 225 UMTS USB stick. The following additional files will be needed (local copies):
- Drivers for the UMTS stick [files\hso-1.6.tar.gz]
- A program allowing to change the mode in which the device runs (the mass storage mode for Windows driver install, called “ZeroCD”, or the UMTS adapter mode) [files\usb_modeswitch-0.9.4.tar.bz2]
Save the files in a directory on the computer (here /root/081001-orange-umts-install/).
debian:~/081001-orange-umts-install# tar xzf hso-1.6.tar.gz
debian:~/081001-orange-umts-install/hso-1.6# cd hso-1.6
debian:~/081001-orange-umts-install/hso-1.6# make
debian:~/081001-orange-umts-install/hso-1.6# make install
debian:~/081001-orange-umts-install/hso-1.6# dmesg –c
...
debian:~/081001-orange-umts-install/hso-1.6# ifconfig -a
eth0 Link encap:Ethernet HWaddr 00:0d:b9:0d:36:a0
inet addr:192.168.1.67 Bcast:255.255.255.255 Mask:255.255.255.0
inet6 addr: fe80::20d:b9ff:fe0d:36a0/64 Scope:Link
UP BROADCAST RUNNING MULTICAST MTU:1500 Metric:1
RX packets:22591 errors:0 dropped:0 overruns:0 frame:0
TX packets:11850 errors:0 dropped:0 overruns:0 carrier:0
collisions:0 txqueuelen:1000
RX bytes:28116314 (26.8 MiB) TX bytes:939659 (917.6 KiB)
Interrupt:11 Base address:0xfc00
lo Link encap:Local Loopback
inet addr:127.0.0.1 Mask:255.0.0.0
inet6 addr: ::1/128 Scope:Host
UP LOOPBACK RUNNING MTU:16436 Metric:1
RX packets:8 errors:0 dropped:0 overruns:0 frame:0
TX packets:8 errors:0 dropped:0 overruns:0 carrier:0
collisions:0 txqueuelen:0
RX bytes:560 (560.0 B) TX bytes:560 (560.0 B)
debian:~/081001-orange-umts-install/hso-1.6# modprobe hso
debian:~/081001-orange-umts-install/hso-1.6# dmesg -c
[ 1120.607352] hso: /root/081001-orange-umts-install/hso-1.6/hso.c: 1.6-Option Option Wireless
[ 1120.607477] usbcore: registered new interface driver hso
debian:~/081001-orange-umts-install/hso-1.6# cd ..
At this point, plug the USB stick.
debian:~/081001-orange-umts-install/# dmesg -c
[ 1382.135596] usb 1-3: new full speed USB device using ohci_hcd and address 2
[ 1382.340967] usb 1-3: configuration #1 chosen from 1 choice
[ 1382.345135] hso 1-3:1.0: Not our interface
[ 1382.351839] usb 1-3: New USB device found, idVendor=0af0, idProduct=6971
[ 1382.351860] usb 1-3: New USB device strings: Mfr=1, Product=2, SerialNumber=3
[ 1382.351880] usb 1-3: Product: Globetrotter HSDPA Modem
[ 1382.351896] usb 1-3: Manufacturer: Option N.V.
[ 1382.351910] usb 1-3: SerialNumber: Serial Number
[ 1382.892107] Initializing USB Mass Storage driver...
[ 1382.895129] scsi0 : SCSI emulation for USB Mass Storage devices
[ 1382.895965] usbcore: registered new interface driver usb-storage
[ 1382.895992] USB Mass Storage support registered.
[ 1382.896748] usb-storage: device found at 2
[ 1382.896768] usb-storage: waiting for device to settle before scanning
[ 1387.897237] usb-storage: device scan complete
[ 1387.901003] scsi 0:0:0:0: CD-ROM ZCOPTION HSDPA Modem 3.00 PQ: 0 ANSI: 2
[ 1388.402483] Driver 'sr' needs updating - please use bus_type methods
[ 1388.412027] sr0: scsi-1 drive
[ 1388.412027] Uniform CD-ROM driver Revision: 3.20
[ 1388.412027] sr 0:0:0:0: Attached scsi CD-ROM sr0
[ 1388.999992] sr 0:0:0:0: Attached scsi generic sg0 type 5
It is for now recognized as a CD-ROM device. We need the usb_modeswitch program to change the operating mode to UMTS adapter.
debian:~/081001-orange-umts-install# tar xjf usb_modeswitch-0.9.4.tar.bz2
debian:~/081001-orange-umts-install# cd usb_modeswitch-0.9.4
debian:~/081001-orange-umts-install/usb_modeswitch-0.9.4# vi usb_modeswitch.conf
...
debian:~/081001-orange-umts-install/usb_modeswitch-0.9.4# grep -Ev "(^;|^#)" usb_modeswitch.conf | uniq
DefaultVendor= 0x0af0
DefaultProduct= 0x6971
TargetClass= 0xff
MessageEndpoint=0x05
MessageContent="55534243785634120100000080000601000000000000000000000000000000"
debian:~/081001-orange-umts-install/usb_modeswitch-0.9.4# cp usb_modeswitch.conf /etc/
debian:~/081001-orange-umts-install/usb_modeswitch-0.9.4# ./usb_modeswitch
* usb_modeswitch: tool for controlling "flip flop" mode USB devices
* Version 0.9.4 (C) Josua Dietze 2008
* Works with libusb 0.1.12 and probably other versions
Looking for default devices
Found default devices (1)
OK, found default device not in target class mode
Prepare switching, accessing latest device
Looking for active default driver to detach it
OK, driver found ("usb-storage")
OK, Driver "usb-storage" successfully detached
Setting up communication with device
Trying to send the message
OK, message successfully sent.
-> See /proc/bus/usb/devices (or call lsusb) for changes. Bye
Error: releasing interface failed (error -19). Trying to continue
debian:~/081001-orange-umts-install/usb_modeswitch-0.9.4# dmesg -c
[ 1756.221493] usb 1-3: USB disconnect, address 2
[ 1757.764057] usb 1-3: new full speed USB device using ohci_hcd and address 3
[ 1757.968017] usb 1-3: configuration #1 chosen from 1 choice
[ 1757.977042] hso0: Disabled Privacy Extensions
[ 1757.984772] usb 1-3: New USB device found, idVendor=0af0, idProduct=6971
[ 1757.984801] usb 1-3: New USB device strings: Mfr=1, Product=2, SerialNumber=4
[ 1757.984821] usb 1-3: Product: Globetrotter HSDPA Modem
[ 1757.984837] usb 1-3: Manufacturer: Option N.V.
[ 1757.984851] usb 1-3: SerialNumber: Serial Number
Now it is in the correct operation mode. Check that the interface hso0 has been created:
debian:~/081001-orange-umts-install/usb_modeswitch-0.9.4# ifconfig -a
eth0 Link encap:Ethernet HWaddr 00:0d:b9:0d:36:a0
inet addr:192.168.1.67 Bcast:255.255.255.255 Mask:255.255.255.0
inet6 addr: fe80::20d:b9ff:fe0d:36a0/64 Scope:Link
UP BROADCAST RUNNING MULTICAST MTU:1500 Metric:1
RX packets:25171 errors:0 dropped:0 overruns:0 frame:0
TX packets:13433 errors:0 dropped:0 overruns:0 carrier:0
collisions:0 txqueuelen:1000
RX bytes:28331090 (27.0 MiB) TX bytes:1203377 (1.1 MiB)
Interrupt:11 Base address:0xfc00
hso0 Link encap:UNSPEC HWaddr 00-00-00-00-00-00-00-00-00-00-00-00-00-00-00-00
POINTOPOINT NOARP MULTICAST MTU:1486 Metric:1
RX packets:0 errors:0 dropped:0 overruns:0 frame:0
TX packets:0 errors:0 dropped:0 overruns:0 carrier:0
collisions:0 txqueuelen:10
RX bytes:0 (0.0 B) TX bytes:0 (0.0 B)
lo Link encap:Local Loopback
inet addr:127.0.0.1 Mask:255.0.0.0
inet6 addr: ::1/128 Scope:Host
UP LOOPBACK RUNNING MTU:16436 Metric:1
RX packets:8 errors:0 dropped:0 overruns:0 frame:0
TX packets:8 errors:0 dropped:0 overruns:0 carrier:0
collisions:0 txqueuelen:0
RX bytes:560 (560.0 B) TX bytes:560 (560.0 B)
The next step is to connect to the access point (here Orange). We have to modify some parts of the connect.sh script.
debian:~/081001-orange-umts-install/hso-1.6# vi connect.sh
#!/bin/sh
export APN="mobileoffice3g"
#export USR="eplus"
#export PAS="gprs"
export PIN="XXXX"
#export APN="web.vodafone.de"
#export USR=""
#export PAS=""
DEVICE=/dev/ttyHS0
TMPFIL=/tmp/connect.$$
up() {
echo connecting
stty 19200 -tostop
rm -f $TMPFIL
(
/usr/sbin/chat -E -s -V -f dial.cht <$DEVICE > $DEVICE
) 2>&1 |tee $TMPFIL
echo " "n inet
echo connected
echo " "
PIP="`grep '^_OWANDATA' $TMPFIL | cut -d, -f2`"
NS1="`grep '^_OWANDATA' $TMPFIL | cut -d, -f4`"
NS2="`grep '^_OWANDATA' $TMPFIL | cut -d, -f5`"
ifconfig hso0 $PIP netmask 255.255.255.255 up
ORT="`route | grep default | awk '{printf $8}'`" # find the old default route and replace it
route delete default dev $ORT
echo "add route"
route add default dev hso0
mv -f /etc/resolv.conf /tmp/resolv.conf.tmp
echo "set nameserver"
( # update the DNS
echo "nameserver $NS1"
echo "nameserver $NS2"
) > /etc/resolv.conf
rm -f $TMPFIL
}
...
Now we can initialize the connection:
debian:~/081001-orange-umts-install/hso-1.6# ./connect.sh up
connecting
ATZ
OK
AT_OWANCALL=1,1,0
OK
AT_OWANDATA=1
_OWANDATA: 1, 10.22.3.18, 0.0.0.0, 213.55.128.1, 213.55.128.2, 0.0.0.0, 0.0.0.0, 72000
OK n inet
connected
add route
set nameserver
NAT setup
The following commands are sufficient to setup a simple NAT. It will forward and translate the address of packets coming from interface eth0 (the wired interface) to interface hso0 (the UMTS stick).
debian:~# echo 1 > /proc/sys/net/ipv4/ip_forward
debian:~# iptables --flush
debian:~# iptables -A FORWARD -i eth0 -j ACCEPT
debian:~# iptables -A FORWARD -o eth0 -j ACCEPT
debian:~# iptables -t nat -A POSTROUTING -o hso0 -j MASQUERADE
eth0 is configured with static IP address 192.168.1.1 in the /etc/network/interfaces file:
# The loopback network interface
auto lo
iface lo inet loopback
# The primary network interface
allow-hotplug eth0
auto eth0
iface eth0 inet static
address 192.168.1.1
netmask 255.255.255.0
DHCP and DNS
For convenience, we install a DHCP and DNS server on our UMTS gateway. This will allow simply plugging a SIP telephone to our UMTS gateway and having it working.
debian:~# apt-get install dhcp3-server
debian:~# apt-get install bind9
The configurations are very close to the defaults. For the DHCP server (/etc/dhcp3/dhcpd.conf), we add the 192.168.1.0/24 zone and set the server to be authoritative:
authoritative;
subnet 192.168.1.0 netmask 255.255.255.0 {
range 192.168.1.2 192.168.1.254;
option routers 192.168.1.1;
option domain-name-servers 192.168.1.1;
}
For the DNS server we keep the default configuration without modifications. It will act as a caching server, relaying requests to the default DNS servers (obtained from Orange through DHCP, visible in /etc/resolv.conf).
Startup script
Finally, to launch the connection and initialize the NAT at startup, we add a startup script /etc/init.d/orange-umts and set it executable with chmod a+x /etc/init.d/orange-umts. The contents of the script are as follows:
#! /bin/sh
# /etc/init.d/orange-umts
#
case "$1" in
start)
echo "Starting UMTS connection"
/root/081001-orange-umts-install/usb_modeswitch-0.9.4/usb_modeswitch
sleep 10
cd /root/081001-orange-umts-install/hso-1.6/
./connect.sh up
echo "ok"
echo "Enabling NAT"
echo 1 > /proc/sys/net/ipv4/ip_forward
iptables -A FORWARD -i eth0 -j ACCEPT
iptables -A FORWARD -o eth0 -j ACCEPT
iptables -t nat -A POSTROUTING -o hso0 -j MASQUERADE
echo "ok"
;;
stop)
echo "Stopping UMTS connection"
/root/081001-orange-umts-install/hso-1.6/connect.sh down
echo "ok"
;;
restart)
$0 stop
$0 start
;;
*)
echo "Usage: /etc/init.d/orange-umts {start|stop|restart}"
exit 1
;;
esac
exit 0
The script should obviously be improved, it was quickly written to work. Of course, the UMTS stick has to be connected for the script to work. Finally we add the connection script to the boot sequence:
update-rc.d orange-umts defaults
Cron
The UMTS connection sometimes hangs. So we add a small script launched periodically via cron to restart the connection when needed (the echo commands are commented in the running machine, to avoid filling the logs):
#!/bin/bash
if ping -c1 google.ch > /dev/null 2>&1
then
echo "success"
echo "`date`: success" >> /var/log/umts.log
else
echo "fail `date`"
echo "`date`: ERROR - restarting connection" >> /var/log/umts.log
/etc/init.d/orange-umts restart
fi
We add a line to call the script in /etc/crontab:
SHELL=/bin/sh
PATH=/usr/local/sbin:/usr/local/bin:/sbin:/bin:/usr/sbin:/usr/bin
# m h dom mon dow user command
17 * * * * root cd / && run-parts --report /etc/cron.hourly
25 6 * * * root test -x /usr/sbin/anacron || ( cd / && run-parts --report /etc/cron.daily )
47 6 * * 7 root test -x /usr/sbin/anacron || ( cd / && run-parts --report /etc/cron.weekly )
52 6 1 * * root test -x /usr/sbin/anacron || ( cd / && run-parts --report /etc/cron.monthly )
#
*/1 * * * * root /root/scripts/ping.sh > /dev/null 2>&1
Keep files in RAM
To avoid damaging the compactflash card too quickly (write cycles are limited), we will keep the logs in RAM, and write them to the flash only at shutdown. For this we create a RAM file system (tmpfs) mounted at /var/log and add an init script to copy the contents at startup/shutdown. The same is done for directories /var/tmp, but here we do not keep the contents.
debian:~# mkdir /var/disk-log
debian:~# chmod 777 /var/disk-log/
debian:~# rm -r /tmp/
debian:~# cd /
debian:/# ln -s var/tmp/ tmp
The RAM file systems are declared in /etc/fstab:
# /etc/fstab: static file system information.
#
# <file system> <mount point> <type> <options> <dump> <pass>
proc /proc proc defaults 0 0
/dev/hda1 / ext3 errors=remount-ro 0 1
tmpfs /var/tmp tmpfs size=96M 0 0
tmpfs /var/log tmpfs size=96M 0 0
The simple script that will copy the log files from disk to RAM is as follows:
debian:~# cat /etc/init.d/ramfs-log.sh
#! /bin/sh
### BEGIN INIT INFO
# Provides: ramfs
# Required-Start: mountall
# Required-Stop:
# Default-Start: S
# Default-Stop:
# Short-Description: copy /var/log content in ramdisk
# Description: copy /var/log content in ramdisk
### END INIT INFO
case "$1" in
start)
echo "Copying /var/log contents to ramdisk"
cp -a /var/disk-log/* /var/log/
;;
stop)
echo "Copying /var/log contents to disk"
cp -a /var/log/* /var/disk-log/
;;
*)
echo "Usage: ramfs.sh [start|stop]" >&2
exit 3
;;
esac
Now we must add the script in the correct order in the boot/shutdown sequence. See http://www.debian-administration.org/articles/212 for description of the runlevels. We add it for start at sequence 37 in the S runlevel to launch it as soon as possible in the boot sequence (after the partitions are mounted). For the shutdown/reboot, we add it with sequence 99 to execute last. It is probably not the right way to do, but works fine for our usage.
update-rc.d ramfs-log.sh start 37 S . stop 99 0 1 6 .
The system will now automatically copy the logs at boot/shutdown/reboot.
Remark: We choose position 37 of the S runlevel because file systems are mounted at positions 35 to 37. This can be different depending on the Linux distribution, etc.
alix:~# ls /etc/rcS.d/
README S05keymap.sh S30checkfs.sh S39ifupdown S55urandom
S01glibc.sh S08hwclockfirst.sh S30procps S40networking S70x11-common
S02hostname.sh S10checkroot.sh S35mountall.sh S43portmap S99stop-bootlogd-single
S02mountkernfs.sh S11hwclock.sh S36mountall-bootclean.sh S44nfs-common
S03udev S12mtab.sh S36udev-mtab S48console-screen.sh
S04mountdevsubfs.sh S18ifupdown-clean S37mountoverflowtmp S50alsa-utils
S05bootlogd S20module-init-tools S37ramfs-log.sh S55bootmisc.sh
Possible problems
After transfer from the normal PC to the Alix, networking does not work
This can be caused by udev renaming the Ethernet interface (e.g. eth1 instead of eth0), because of the MAC address change. To correct this, remove udev net persistent rules and reboot the computer.
Linux does not boot if no monitor is plugged on the Alix
Without a monitor being plugged on the VGA port of the Alix mainboard, Linux boot hangs before the bootloader appears. This is a known bug, according to the Alix user manual [pdf] : “Linux boot may hang if no monitor is attached. According to customer reports this issue can be avoided by grounding pin 12 (DDCDAT) of the VGA connector. This seems to be caused by a VGA BIOS issue, FS and GS segment registers not restored when no monitor present. This can be worked around by adding push fs / push gs / pop gs / pop fs instructions around the int 10h call that tries to get the video settings (ah = 0fh).”
To overcome this we followed the user manual recommendation, using a VGA to DVI adapter to ground the mentioned pin (DDCDAT) on the DVI plug. As shown by the DVI pinout shown on the following links, this means linking DVI pins 7 and 15 together:
http://www.nti1.ca/dvi-vga.html
http://www.interfacebus.com/Design_Connector_Digital_Visual_Interface_DVI_Bus.html
Using an existing adapter allows easy unplugging/plugging of the adapter and monitor, without risking to mix the pins and break something.
References
Pcengines website: http://www.pcengines.ch/
Hso driver: http://www.pharscape.org/component/option,com_forum/Itemid,68/page,viewforum/f,14/
Usb_modeswitch: http://www.draisberghof.de/usb_modeswitch/
DVI pinout: http://www.interfacebus.com/Design_Connector_Digital_Visual_Interface_DVI_Bus.html
Dvi-VGA pinout correspondance: http://www.nti1.ca/dvi-vga.html
Initial tests using SIP phones on a UMTS connection: http://switzernet.com/public/080723-PC_UMTS/
* * *